Categories
Uncategorized

Mashematics

Mashematics is a Canberra Brew Supply business whose origins date back to early 2003.

If you are looking for our on-line shop click here https://mashematics.net/wp/shop/

You will find our pricing reasonable compared to what is out there and excellent in the context of what is available in Canberra.

But if you are a financial member of Canberra Brewers you can take advantage of excellent discounts, bulk buys and one time offers.

Categories
Uncategorized

Oxygen Part 1…grain, crack, mash.

Oxygen its what we breath, our most basic sustenance, yeast feels the same way. The best brewers oxygenate their cooled worts as a matter of course

However it can be and is not good for our beer in other processes everything your grain should as fresh as possible but by by fresh thats up to at least two years old and 4 years or longer if stored cool and dry. For this we can thank Acsorbic Acid Oxydase which not only keeps our grain fresh along with other compounds but slows the oxidation of polyphenols and thiols in the mash.

However as soon as your grain is cracked oxygen starts it’s nasty work and gets to the AAO. A window of 15 minutes from crack to mash is considered safe.

The water that we pour is about 8ppm and at mash temperatures about 4ppm which is a significant amount of oxygen. We need to deaerate our mash water, the easiest way is boil and quickly cool to strike temperature (water absorbs oxygen from the atmoshere at 1-2 ppm per hour).

The grain should be added dry and the strike water under-let for least possible oxygen uptake, but it will happen during the course of the mash so to the mash sparge water add 30ppm potassium metabisulphite, this should be about right as we want to knock out any oxygen that finds, usually through agitation, its way in. It is also helpfull to add Brew Tan B at 1.5g per 20 litres of mash sparge water.  The gallotannins in BrewTan B react with wort proteins and is highly effective at coagulating proline and thiol containing proteins which are involved in lipid and protein oxidation.

If you are recirculating then keep the outlet well under the top of the mash and also be very scared of how you sparge, and if you do use the drain out of the pipe method keep the bottom of the pipe just under the drained wort level by using a pulley attachment.

These products are readily available from Mashematics
Categories
Uncategorized

Mill gap size

Much is written about mill gap, some from highly reliable sources and others, well its the internet !

From a small scale brewing point the most importants factors are minimal flour , maximum whole husk and lots of grits, so it is always a god idea to to have a look at the crack after the few first few hundred grams.

We sell mainly Gladfield New Zealand malts. These grains are very plump and very friable. If you are used to using less friable and slimmer grains you almost certainly have your mill gap too small for the best efficiency with Gladfields.

Here is what Gladfields have to say:

Mill gap. In this blog, I would like to draw your attention to your grain mill.

Your mill is the most important equipment you have in your brewery, without it, you could not start your brewing day.

How many of you spare a thought of your mill dying on you on a brew day? Pretty serious aye! Your mill doesn’t need to be fancy, flash or very powerful. To be honest, the most important thing about your mill is the roller gap size.

If the gap is too wide, you will under crush your malts resulting in poor yield per kilo of malt to litres of beer. If you have it too tight you will have issues with off flavours because you have trashed the husk and the most painful part of having your mill gap too tight is that you will have higher chance to have a stuck mash.

No one wants to spend longer then it is needed to brew a beer, so you all have to agree the mill gap is quite important.

Gladfield Malts are consistent in size. We screen our malts on a 2.5 mm screens which not many maltings around the world do. Most maltings de-culm the malts but not screen it. Hence our malts are free of dust, sticks and small grains.

New Zeland is famous for its plumpness which helps. If you brew with Gladfield Malts you will see consistency in grain size, if you lock your mill to the ultimum gap size you don’t need to alter from brew to brew, your welcome!

I measured our pilot brewery’s 2 roller mill now you have a size to go by.

The measured gap is 1.45 mm. We have set our mill to reflect our malts plumpness and never had any issues with runoffs or stuck mashes.

Below is our blurb about malt crush:

Our malts are both plumper and more friable. If the malt mill roller is too tight, Gladfield’s malt will be more likely to shatter and create too much flour. Consequently, brewers could experience stuck mashes. We recommend checking the malt crush before brewing with our malts for the first time. For the ideal malt crush look for the following:

• Husk – 20%
• Coarse Grits – 35%
• Fine Grits – 35%
• Flour – 10%

The average size of our malt grain is >2.8mm for barley and wheat.
Categories
Uncategorized

Hop Storage, age and degradation

Hops are only harvested once a year per hemisphere. This requires that hops are packed and stored in conditions that optimise that just pelleted quality. The Northern harvest happens about now but we do not start receiving hops here to typically late March (apart from some urgent airfreight varieties). Clearly the suppliers want to move move most the previous years first and the simple fact is that well stored they as perfectly fresh as the incoming.

What is well packed and what is well stored and how long will hops last before they start to noticeably degrade, well clearly that depends on the packing and storage. Hops are not unusual in that the big killer is air, and specifically oxygen.

Most importantly then the hops need to avoid air, ideally this is vacuum packing, they need to be kept cold (freezing is not required but may not hurt) and away from light. The worst possible storage is in clear plastic bags, which have a high oxygen permeability, outside the fridge and in the light. Clear bags (such as oxygen barrier bags that have been vac sealed and kept in the dark) are fine, this very handy if you are repacking on household vac-sealer.

There is a measure, that goes back to the 70’s called Hop Storage Index (HSI). This the amount of alpha acid acid loss after 6 months at 25C. Not much use us really !!

Here is a link to a Czech paper on hop storage, they conclude “Each component of hops has its specific value in beer brewing. These experiments have shown that the only safe way to preserve bitter acids is to store the hop pellets in a chilled space without air access.” https://onlinelibrary.wiley.com/doi/full/10.1002/jib.40

Correctly packed and stored your expensive dried hops will have no problem maintaining their quality over three years and probably more. Badly packed and after 6 months things start going cheesey.

Categories
Uncategorized

Bio Transformation

There have been some great discussions and education in Canberra Brewers on Bio Transformation

Here is a nice simple one pager:

LAL-bestpractices-Biotransformation-print+bleed (1)

Categories
Uncategorized

Calcium…O Calcium

It is often said that Calcium is good for your bones and good for your beer. Canberra’s water @ 13 is fine Ca wise for Pils but a bit low for many styles (O Vienna @ 200 or Burton @270)

Here is a bit from (you will get a 404, mine is an old copy) http://www.rpi.edu/dept/chem-eng/Biotech-Environ/beer/water2.htm

<<Of the ions required for brewing, calcium is by far the most important. This is because of the acidifying effect that calcium has on the wort. […] A combination of the presence of calcium ions and the decrease in pH has a number of effects on the brewing process:

  • The lower pH improves ß-amylase activity and thus wort fermentability and extract. The optimum pH for ß-amylase activity is about 4·7. Wort produced from liquor containing no calcium has a pH in the order of 5·8 – 6·0, compared to values in the range of 5·3 – 5·5 for worts produced from treated brewing liquor. The activity of the ß-amylase then is greatly enhanced by the addition of calcium, this enzyme increasing the production of maltose from Amylose, and thus making worts more fermentable.
  • Calcium has a beneficial effect on the precipitation of wort proteins, both during mashing and during the boil.

Protein-H + Ca2+ (r) Protein-Ca ¯ + 2H+

The hydrogen ions released further reduce the pH which encourages further precipitation of proteins.

Proteins are also degraded, that is converted to simpler substances by proteolytic enzymes called proteases. These are found in the malt, and have optimum activity at pH values of about 4·5 – 5·0. The reduction in pH then caused by the presence of calcium encourages proteolysis, further reducing protein levels and increasing wort Free Amino Nitrogen levels (FAN).

FAN compounds are utilised by the yeast during fermentation for the manufacture of amino acids, and an increase in FAN levels in the wort improves the health and vigour of the yeast.

High protein levels in beers also have negative effects, making beer more difficult to fine and encouraging formation of hazes, in particular chill hazes. Product shelf life can also be adversely affected.

  • Calcium ions protect the enzyme a-amylase from inhibition by heat.

a-amylase is an endo enzyme, cleaving the internal 1,4 glucosidic links of amylopectin resulting in a rapid reduction in wort viscosity. The optimum temperature range for

a-amylase activity is 65°C – 68°C, but the enzyme is rapidly destroyed at these temperatures. Calcium stabilises a-amylase to 70 – 75°C.

It can be seen then that the presence of calcium has positive effects on the activity of a-amylase, ß-amylase and Proteases, some of the most important enzymes in the brewing process.

  • The drop in pH encouraged by Calcium ions in the mash and copper helps afford the wort and subsequent beer produced a greater resistance to microbiological infection.
  • The reduced pH of the sparge liquor reduces extraction of undesirable silicates, tannins and polyphenols from the mash bed. The extraction of such materials is encouraged by alkaline sparge liquor. These materials are very undesirable, contributing to harsh flavours, hazes in the finished beer and decreased beer stability.
  • Calcium precipitates oxalates as insoluble calcium oxalate.

This again occurs in both the mash tun and the copper. If oxalates are not removed they can cause hazes in finished beers and also contribute to the formation of beerstone in FV’s, CT’s and casks. Oxalates are also thought to promote gushing in certain beers, although this is not generally a problem to the micro brewer.>>

Generally speaking you will use Calcium Chloride for maltier beers and Calcium Sulphate for hoppier beers or ideally a combination of the two.

More to come

Categories
Uncategorized

Brut IPA..you too

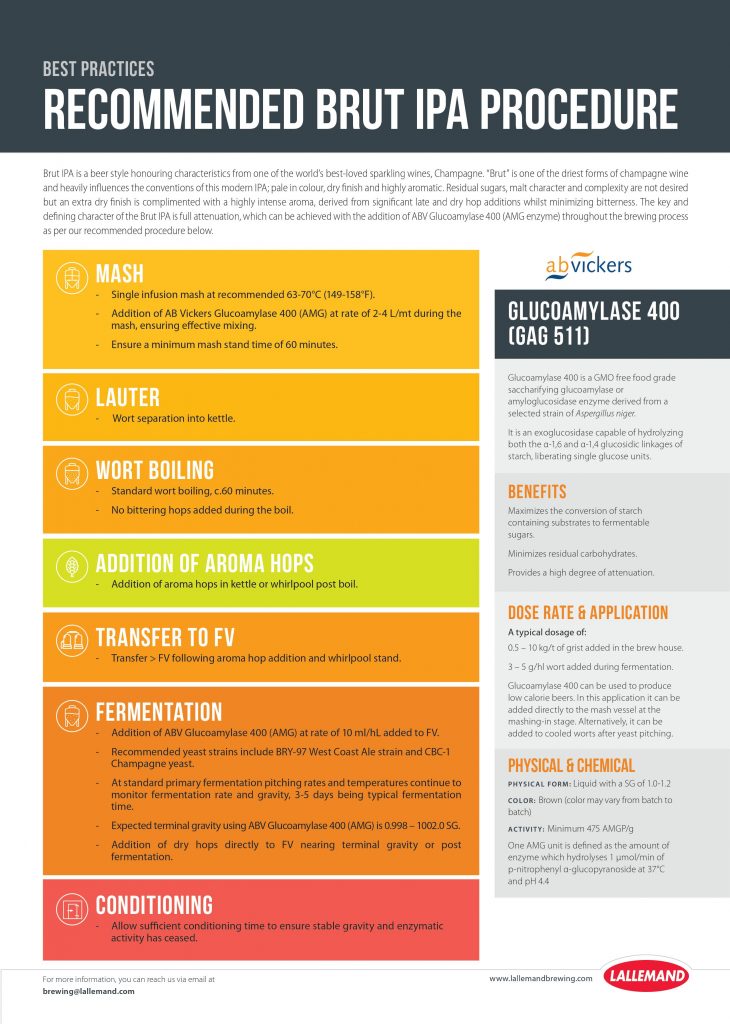
Brut IPA seems to be the current Wunderkid and I thinks makes a nice balance with the slightly older kid on the block NEIPA. I have only tasted one commercial example and no home brewed though I intend to make “Trotskys End” in a few weeks.

The use of enzymes in beer is nothing new, were it not for enzymes we would not have beer. Large commercial operations use added enzymes to make..shudder at the thought..Lo-carb beers…

So if you want to try to replicate here is a fact sheet

Brut IPA..you too 1

Mashematics will be stocking Glucoamylase. Keep an eye out.

Categories
Tips,Tools and Technical

Beer line–how long?

This should be simple question and there are some simple equations out there using keg pressure and line resistance that may get you close.

A really good article that takes many things (too many things?…your final gravity..) that can be found here http://www.mikesoltys.com/2012/09/17/determining-proper-hose-length-for-your-kegerator/

The calculator is pretty bonza as well ..if you live in the imperial world.

The real factor here , which is quite significant, have a play with it, is time to pour a pint , a US Pint or about a schooner.

Using this calculator I have derived a pretty good fit form which you will see below. I have allowed for a carbonation of about 2.25 volumes at Canberra altitude. This is low end basic beers, a bit high for English ales but you can adjust by guesswork. I have also set the hose ID at 5mm and agree that 10 seconds is a nice Goldilocks time.

Categories
Uncategorized

High Gravity and ABV

Alcohol does strange things.

One of those means that the ABV calculated by good old simple OG-FG * x is pretty good up to about 6% ABV when the results start to drift. This is not new and was observed by Daniels in his classic Brewing Great Beers. Having brewed a RIS with some pretty stupid gravities I found calculating using this method was the better path.

So here it is (the first of a number of online calculators)

Categories
Uncategorized

How to measure pH (AJ deLange)

I would like to thank AJ deLange for permission to re-post his pages.

pH Meter Calibration Procedure

I frequently get asked about how to use and calibrate a pH meter. Let’s start with use and then move on to calibration.

Measurement of mash pH is the use to which meters are most often put by brewers. Assuming the meter is calibrated (see below) here is how that is done.

1. Stir the mash thoroughly. This is especially important if the measurement is to check on the effects of an acid or alkali addition. Withdraw a small sample of the liquid. It doesn’t matter if some grain is included.
2. Cool the sample to room temperature, ideally the same temperature as the buffers you used for calibration. This prolongs electrode life and reduces the burden on ATC. If you use a small metal saucepan you can achieve the cooling quickly by immersing it in cool/cold water.
3. Rinse the electrode with DI water, shake off and blot (see calibration below) and insert the electrode into the sample. Move the electrode around for a few seconds (sample rinses any water off bulb and junction) then stop and wait until the reading is stable. Some meters will decide when the reading is stable for you and beep to signal this. Record both the reading and the temperature.
4. Repeat the process every 5 minutes or so until the readings stop changing. This usually 15 – 30 minutes after strike.
5. Rinse the electrode with DI water and return to storage solution or just tap water for short term (i.e. between readings) storage.

For calibration the overall instructions are simple: follow the manufacturer’s instructions. For those who don’t have a meter in hand and want to have an idea as to what is involved or for whom the supplied instructions are less than adequate the following is offered.

Buffers and samples should be at room temperature.

1. Store the electrode in a storage solution recommended by the manufacturer. This will often be a saturated or nearly saturated solution of potassium chloride.
2. Prepare fresh 4 and 7 buffer solutions using deionized water. Several manufacturers sell capsules of powder which contain the buffers’ chemical components. These are simply added to a specified amount of DI water (50 or 100 mL) just before use. Premixed buffers are also sold in sealed packages (similar to the ketchup packages from fast food restaurants). These work as well as the buffers one mixes on the spot and are obviously more convenient but tend to be, because of the packaging, more expensive. Premixed buffers are also sold in bulk i.e. 1 L bottles or 4 L jugs or cubitainers. If buffers in this form are being used check that they are not beyond their expiration dates and pour small amounts of each into a clean beaker or preferably, sealed container, at the beginning of each brew day. Do not return used buffer to the bulk storage.
3. Remove the storage cap from the electrode. If the electrode is the refillable type, insure that it contains adequate fill solution, top up if neecessary and, whether you top up or not, open the fill hole so air can enter the electrode body allowing fill solution to freely flow out through the reference junction.
4. Rinse the electrode with a stream of DI water from a wash bottle. Blot dry with clean tissue or paper towel. Don’t touch the actual electrode bulb when you do this. You don’t need to get all the adhering water, just the bulk of it. Wicking of water into the paper is adequate.
5. Turn the meter on, allow it to stabilize for a few minutes, and then lower the electrode into the first buffer solution. With most modern meters it does not matter which one you go into first as these meters have automatic buffer recognition. Following the manufacturer’s instructions put the meter in calibration mode and initiate calibration if necessary (e.g. press the ‘read’ or ‘Cal’ button).
6. Move the electrode around in the buffer a little to rinse any adhering DI water off the bulb and away from the reference junction.
7. Wait until the reading stabilizes. Modern instruments tend to have stability indicators which beep or otherwise alert the operator when the reading is stable (hasn’t changed by more than a threshold amount in a given period of time). These often also instruct the operator ro move on to the next buffer when stability is detected. In others you may have to determine when the reading is stable yourself and indicate this to the meter by pressing a button. Follow the manufacturers instructions and/or prompts on the meter’s display.
8. When instructed to move to the second buffer, remove the electrode from the first buffer, shake adhering buffer off and rinse with a stream DI water. Blot away as above and insert the electrode in the second buffer. Move electrode around in second buffer.
9. When the second reading is stable, take whatever action is necessary to complete the measurement as above. In some meters there will be an option for a third buffer. In those meters you will have to do something (e.g. press an ‘exit’ button) to indicate to the meter that calibration is complete if you are doing a 2 buffer calibration.
10. The instrument will now calculate the calibration parameters (slope and offset) and, in some cases, display these to you in the case of slope either as a percentage (should be near 100) or a number like 57.3 which is the number of millivolts change per unit change in pH at some reference temperature. The offset will be a millivolt number which should be small i.e. a few millivolts (it can be negative). If the meter presents those numbers, write them in your log book. They represent a record of the rate at which your electrode is aging. Fancy meters will automatically store the calibration data, tagged with time and date, in the meter’s memory.
11. Take whatever action is necessary to indicate that the calibration is to be accepted (e.g. press a ‘store’ or ‘exit’ or other button as directed by the manual).
12. Remove the electrode from the second buffer. Shake, rinse and blot as before. Place in sample.
13. Press ‘read’ button if necessary. Otherwise monitor display. Move electrode around in sample.
14. When reading is stable (as determined by you or meter electronics) record pH and temperature. Fancy meters will automatically store these in memory and some will even transmit them to an external computer.
15. Remove from sample, rinse and blot dry as before. Move to next sample. If finished, rinse extra thoroughly. After shaking and blotting dry insure that cap contains sufficient storage solution to cover bulb and replace cap. Turn meter off if finished for the day. If not finished for the day the probe can be left in the last sample.

11b. As a check on the calibration you can measure the 4 and 7 buffers again at room temperature. You may wish to do this after some time has passed or even after you have finished measuring samples for the day. pH values are often printed on the buffer package. Sometimes they are not. If not and assuming you are using NIST traceable pH 4 and 7 technical buffers the pH values of the buffers are:

pH 7: 1911.4/K -5.5538 + 0.022635*K – 6.8146e-6*K*K

pH 4: 1617.3/K -9.2852 + 0.033311*K – 2.3211e-5*K*K

where K = °C + 273.15 (i.e. K is the temperature in Kelvins).
The values you read should be close to those given by the formulas or on the buffer package. If they are not then your meter is drifting.

Cool the 4 buffer to about 40 °F and measure its pH. Do this right after completing calibration. If your meter reads off by more than a few hundredths then its isolectric point is not equal to 7 and you must be careful to measure buffers and samples at close to the same temperature (ATC won’t work well).